Hello, fellow home enthusiasts! Sara here, your guide to all things cozy and creative at HomeReadyHub. Today, we're diving into the enchanting world of macrame to create a beautiful hanging decoration mobile. Macrame, the art of knotting cord into intricate patterns, has seen a wonderful resurgence, and for good reason! It’s a meditative craft that results in stunning, tactile pieces perfect for adding a touch of bohemian warmth and personality to any space. Whether you're looking to adorn a nursery, bring a calming focal point to your living room, or craft a unique gift, a macrame mobile is a fantastic project. Don't worry if you're a beginner; I'll walk you through every knot and step, ensuring you gain confidence and create something truly special. Let's gather our supplies and get ready to knot our way to a gorgeous, handmade mobile!
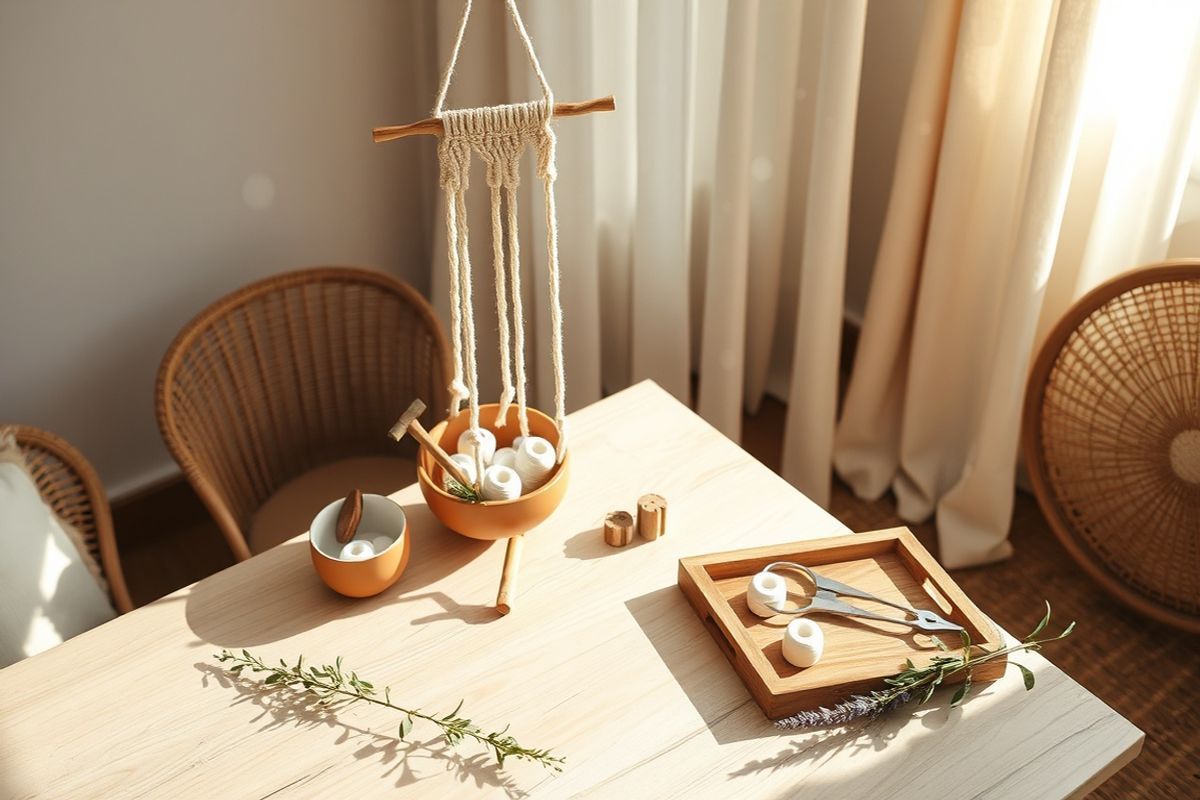
Materials Needed
- Macrame Cord: Approximately 200-300 yards (180-270 meters) of 3mm or 4mm single-strand or 3-ply twisted cotton macrame cord. The exact amount depends on your design's complexity and length. Natural cotton is popular for its soft texture and eco-friendly appeal, but feel free to experiment with jute or recycled cotton.
- Main Hanger: One wooden dowel (12-18 inches / 30-45 cm long) or a sturdy wooden/metal hoop (8-12 inches / 20-30 cm diameter). This will be the top structure from which your mobile hangs.
- Smaller Wooden Rings/Hoops: 3-5 rings (2-4 inches / 5-10 cm diameter) to create individual hanging elements for the mobile.
- Wooden Beads: A selection of various sizes (e.g., 10-25mm) with large enough holes for your macrame cord to pass through. These add weight, texture, and visual interest.
- Sharp Scissors: Essential for clean cuts.
- Measuring Tape or Ruler: For accurate cord cutting and design planning.
- S-Hook or Clothes Rack: To hang your main hanger while you work, making knotting much easier.
- Comb: (Optional) For brushing out fringes and tassels to create a soft, feathery look.
- Fabric Stiffener or Hairspray: (Optional) To help maintain the shape of fringes if desired.
- Sketchpad and Pencil: For planning your design.
Preparation Steps
Step 1: Planning Your Design & Cutting Cords
Before you dive into knotting, take a moment to visualize your mobile. Will it be symmetrical or asymmetrical? How many hanging elements do you want, and how long should they be? A simple sketch can go a long way in guiding your process. Consider the space where the mobile will hang – a nursery might call for softer, shorter elements, while a living room could handle a more dramatic, longer design.
Once you have a rough idea, it's time to cut your cords. A general rule of thumb for macrame is to cut your working cords four times the desired finished length for moderate knotting, or even more (5-6 times) if your design is very dense with knots. It's always better to have too much cord than too little! For the main hanger, you'll need a few longer cords to create the top suspension and potentially some foundational rows of knots. For the individual hanging elements, estimate the length of each 'strand' you want to create, then multiply by four. For example, if you want a finished piece of macrame that is 20 inches long, you'll need a cord that is 80 inches long. Don't stress too much about exact numbers at this stage; you can always trim later. Cut your cords and keep them organized, perhaps bundling cords for specific sections together.
Step 2: Attaching Cords to the Main Hanger
Now that your cords are cut, let's attach them to your main wooden dowel or hoop. The most common and secure way to do this is using a Lark's Head Knot. To create a Lark's Head Knot:
- Take one of your cut cords and fold it in half.
- Place the folded loop over the top of your dowel/hoop.
- Bring the two loose ends of the cord underneath the dowel/hoop and thread them through the loop.
- Pull the ends firmly to tighten the knot around the dowel/hoop.
Repeat this process, attaching all the cords you've designated for the main hanger. Ensure they are evenly spaced along the dowel or hoop. If you're using a dowel, you might attach 4-8 cords for the main structure. If you're using a hoop, you can attach cords all the way around, or just in specific sections, depending on your vision. Hang your main hanger from your S-hook or clothes rack at a comfortable working height. This setup will save your back and make knotting much more enjoyable!
Assembly
Step 3: Creating the Main Structure & Knots
With your cords attached, it's time to bring your mobile to life with knots. For a macrame mobile, you'll primarily use a few fundamental knots. Practice these a couple of times on a scrap piece of cord if you're new to them:
- Square Knot: This is the backbone of most macrame designs. It's made using four cords. The two outer cords are working cords, and the two inner cords are filler cords. A full square knot consists of a left-facing half knot followed by a right-facing half knot (or vice-versa). It creates a flat, rectangular knot.
- Half Square Knot (Spiral Knot): If you repeat only the left-facing or right-facing half of a square knot, your work will twist, creating a beautiful spiral effect. This is perfect for the hanging strands of a mobile.
- Double Half Hitch Knot: This knot is excellent for creating diagonal or horizontal lines and shaping your work. It involves wrapping a working cord twice around a filler cord.
Start by creating the main structure that will suspend your individual mobile elements. You can use square knots to create a flat panel beneath your main hanger, or spiral knots to create twisted 'branches' that descend. Vary the lengths and patterns to add visual interest. For instance, you could create three main descending sections from your dowel, each made of several spiral knots, ending at different heights. These main sections will then serve as the anchor points for your smaller decorative rings or elements.
Experiment with combining knots. You might start a section with a series of square knots, then transition into a long spiral section, and finish with more square knots. Remember to maintain consistent tension as you tie your knots to ensure a neat and even appearance. Regularly step back and observe your work to ensure it's developing as you intended.
Step 4: Adding Decorative Elements & Finishing
This is where your mobile truly becomes unique! Once you have your main structural pieces descending from your top hanger, you can start incorporating your smaller wooden rings and beads. To attach a smaller ring, you can use a series of Lark's Head Knots or Double Half Hitch knots around the ring itself, using the cords from your main structure. You can then continue knotting below the ring, creating new patterns or attaching more cords.
Adding beads is straightforward: simply thread your macrame cords through the bead's hole. You'll often need to use a smaller piece of wire or tape the cord end to make threading easier. Once the bead is in place, secure it by tying a knot (like a square knot or an overhand knot) directly below it to prevent it from sliding down. Vary the placement of beads – some might be nestled within knot patterns, while others dangle freely at the ends of cords.
For a beautiful finish, consider adding tassels or fringes. At the end of your individual hanging elements, you can leave cords untied and simply trim them to an even length. For a feathery look, untwist the strands of your cord (if using 3-ply) and gently comb them out with a fine-toothed comb. You can use a light mist of fabric stiffener or hairspray to help them hold their shape. Finally, create a sturdy hanging loop at the very top of your main hanger. This can be done by taking two outer cords, tying a series of square knots to form a loop, and then securing the ends with hidden knots or by weaving them back into the main structure. Trim any excess cord neatly.
Mistakes to Avoid
- Uneven Tension: This is perhaps the most common beginner mistake. Inconsistent tension leads to lopsided knots and an untidy appearance. Try to apply the same amount of pull with each knot. Practice helps!
- Not Cutting Enough Cord: It's heartbreaking to run out of cord in the middle of a project. Always err on the side of cutting more than you think you'll need. You can always trim excess, but you can't add more.
- Forgetting to Plan: While spontaneity is fun, a rough sketch or mental plan prevents frustration and ensures your mobile achieves the look you desire.
- Over-Complicating for Beginners: Start with basic knots (Square, Spiral, Double Half Hitch). Don't try to master every complex knot in your first project. Build confidence with the fundamentals.
- Not Securing Knots: Ensure your knots are pulled tight, especially when finishing a section or adding beads. Loose knots can unravel.
- Rushing the Process: Macrame is a meditative craft. Take your time, enjoy the rhythm of the knots, and don't be afraid to undo and redo if something isn't quite right.
Pro Tips
- Optimal Workstation: A comfortable working height is key. Using an S-hook on a curtain rod, a clothes rack, or even a sturdy coat hanger over a door will save your back and make the process much more enjoyable.
- Practice Makes Perfect: If you're new to macrame, take a few minutes to practice each knot on a scrap piece of cord before starting your project. Muscle memory is your friend!
- Measure Frequently: Keep your measuring tape handy and regularly check the lengths of your hanging strands to ensure symmetry (if desired) and a balanced look.
- Embrace Imperfections: Handmade items have character. Don't strive for machine-like perfection; a slight wobble or unique twist adds to its charm.
- Experiment with Textures & Colors: While natural cotton is classic, consider incorporating different cord materials (jute for a rustic feel, waxed cotton for outdoor use) or a pop of color.
- Consider Your Space: Think about where your mobile will hang. Will it catch light? Is it near a wall or free-hanging? This can influence your design choices, such as how many elements dangle.
- Gift It! A handmade macrame mobile makes a deeply personal and cherished gift for baby showers, housewarmings, or birthdays.
And there you have it! Your very own handcrafted macrame hanging decoration mobile. I hope you've enjoyed this creative journey and feel a wonderful sense of accomplishment. Each knot you tied, each cord you placed, contributed to a beautiful piece of art that reflects your unique style. Hang your mobile with pride, knowing you've added a touch of bespoke bohemian charm to your home. Don't forget to share your creations with us at HomeReadyHub – we love seeing what you make! Keep those creative juices flowing, and I'll see you next time for another exciting DIY adventure.
Happy knotting!
Warmly,
Sara from HomeReadyHub