Lighting plays a pivotal role in setting the ambiance of any space. If you're looking for a way to add a touch of vintage charm and global flair to your home, an upcycled globe lamp is the perfect project. This DIY endeavor not only breathes new life into old globes but also allows you to craft a one-of-a-kind lighting piece that sparks conversations.
In this tutorial, we'll guide you through transforming a vintage globe into a stunning lamp that casts a warm, inviting glow. Whether you're a seasoned DIY enthusiast or a beginner, this project is both rewarding and achievable. Let’s dive in!
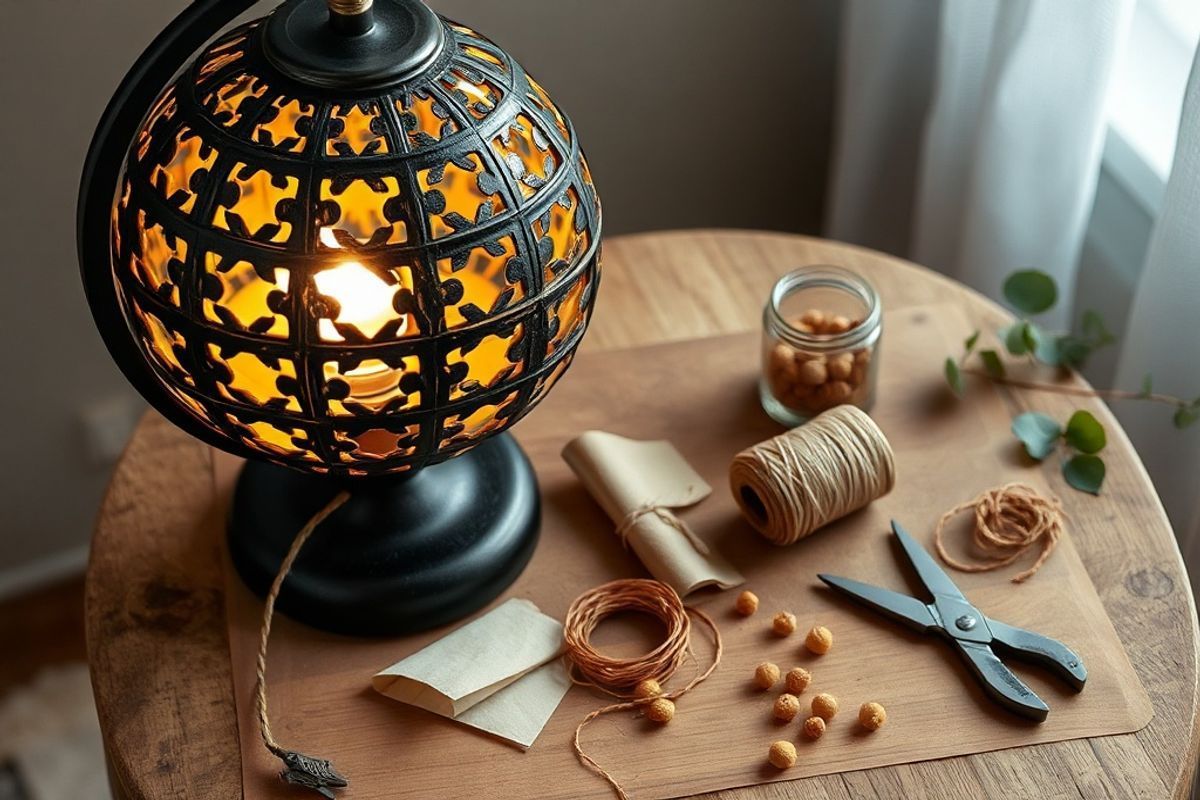
Materials Needed
Before you begin, gather the following materials and tools:
- A vintage globe (found at thrift stores, flea markets, or online marketplaces)
- A lamp kit (socket, cord, plug, and light bulb)
- A drill with a small bit
- A jigsaw or coping saw
- Sandpaper (medium and fine grit)
- Measuring tape or ruler
- Pencil or marker
- Safety goggles and gloves
- Scissors
- Wire strippers
- Screwdriver
- Epoxy glue or strong adhesive (optional)
Ensure the globe is clean and free of dust before starting. If it’s painted or coated, lightly sand it to help the adhesive bond better.
Preparation Steps
Preparation is key to a smooth and successful project. Follow these steps to get started:
Step 1: Choose Your Globe
Select a globe that fits your aesthetic. Look for one with a sturdy construction and a diameter that suits your lamp base. Vintage globes often have intricate maps and aged textures, adding character to your lamp. Avoid globes with water damage or warped material.
If you can’t find a vintage globe, consider using a hollow decorative globe from a craft store. These are often made of plastic or resin and can be painted to your liking.
Step 2: Plan the Lamp Placement
Decide where the lamp socket will go. Typically, the socket is placed at the top or bottom of the globe, depending on your design preference. For a classic look, install the socket at the top. If you want a more modern twist, consider placing it at the bottom, allowing the cord to run down the side.
Use a measuring tape to mark the spot where you’ll drill the hole for the socket. Make sure the hole is large enough to accommodate the socket but not so big that it weakens the globe’s structure.
Step 3: Prepare the Lamp Kit
Assemble your lamp kit according to the manufacturer’s instructions. Most kits include a socket, cord, plug, and light bulb. If you’re using a vintage cord, ensure it’s in good condition and replace it if frayed or damaged.
Test the socket and cord before installation to ensure they work properly. This step prevents any electrical issues once the lamp is assembled.
Assembly
Now comes the fun part—assembling your upcycled globe lamp! Follow these steps carefully:
Step 4: Drill the Hole
Put on your safety goggles and gloves. Use a drill with a small bit to create a pilot hole at the marked spot. This hole will guide the jigsaw or coping saw as you cut out the larger opening.
Carefully insert the jigsaw blade into the pilot hole and cut along the marked line. Take your time to ensure a clean, even cut. If the globe is made of paper mache or thin material, use a coping saw for better control.
Once the hole is cut, sand the edges with medium-grit sandpaper to smooth out any rough spots. Follow up with fine-grit sandpaper for a polished finish.
Step 5: Install the Socket
Thread the lamp cord through the hole from the inside of the globe. Pull it through until the socket is positioned at the top. If the socket doesn’t fit snugly, use epoxy glue or a strong adhesive to secure it in place. Allow the adhesive to dry completely before proceeding.
Attach the light bulb to the socket. Choose a bulb with a warm, soft glow to enhance the vintage aesthetic of your lamp. LED bulbs are energy-efficient and long-lasting, making them an excellent choice.
Step 6: Secure the Cord
To prevent the cord from dangling or getting tangled, secure it to the inside of the globe using small clips or adhesive-backed cable ties. This step ensures a clean, professional look and prevents the cord from interfering with the lamp’s function.
If the cord is too long, trim it to your desired length. Remember to leave enough slack to plug in the lamp comfortably.
Step 7: Test the Lamp
Before completing the project, plug in the lamp to ensure it works correctly. Turn on the light and check for any flickering or dimming, which could indicate a wiring issue. If everything looks good, you’re ready to move on to the final touches.
Mistakes to Avoid
Even the simplest projects can have hiccups, so here are some common mistakes to avoid:
- Skipping the Pilot Hole: Always start with a small pilot hole to guide your jigsaw or coping saw. This prevents the material from splintering or cracking.
- Rushing the Cut: Take your time when cutting the hole. A steady hand ensures a clean, even edge that’s easier to sand and finish.
- Ignoring Safety Gear: Always wear safety goggles and gloves when drilling or cutting. Protect your eyes and hands from debris and sharp edges.
- Overlooking Electrical Safety: Before testing the lamp, double-check all connections. Ensure the cord isn’t frayed and the socket is securely attached to avoid electrical hazards.
- Choosing the Wrong Bulb: Avoid using bulbs that are too bright or cool-toned, as they can detract from the vintage feel of the globe. Opt for warm, soft lighting instead.
Pro Tips
Take your upcycled globe lamp to the next level with these pro tips:
- Customize the Base: Elevate your lamp by pairing it with a unique base. Consider using a wooden pedestal, a metal stand, or even a stack of vintage books for a rustic look.
- Add a Dimmer Switch: Install a dimmer switch to control the lamp’s brightness. This feature adds versatility, allowing you to adjust the lighting for different moods and occasions.
- Embellish the Globe: If your globe is plain, consider painting it or adding decorative elements like gold leaf or decals. This personalizes the lamp and makes it a true statement piece.
- Use a Dimmer Bulb: Choose a dimmable LED bulb to create a cozy atmosphere. These bulbs are energy-efficient and can be adjusted to suit your lighting needs.
- Experiment with Colors: If you’re using a plain globe, paint it in a color that complements your decor. Soft pastels or bold hues can transform the lamp’s appearance.
Don’t be afraid to get creative with your design. The beauty of upcycling is that it allows for endless customization!
Another idea is to pair multiple globe lamps of different sizes for a stunning gallery wall effect. This arrangement adds visual interest and highlights the globes as works of art.
If you’re feeling adventurous, try incorporating LED string lights inside the globe for a whimsical, glowing effect. This approach works especially well with hollow decorative globes.
Lastly, consider the placement of your lamp. A globe lamp can serve as a statement piece on a console table, a bedside table, or even a desk. Its unique design makes it a conversation starter in any room.
For added functionality, you can also incorporate a wireless charging pad into the base of the lamp. This modern touch makes the lamp both stylish and practical.
Remember, the key to a successful upcycling project is patience and creativity. Don’t be discouraged if your first attempt isn’t perfect. Each project is a learning experience, and the result will be uniquely yours.
With these tips and tricks, you’re well on your way to creating a stunning upcycled globe lamp that’s as functional as it is beautiful. Happy crafting!
In a world where sustainability is becoming increasingly important, upcycling offers a creative way to reduce waste and repurpose materials. By turning an old globe into a lamp, you’re not only creating a unique piece of decor but also contributing to a greener planet.
So, gather your materials, roll up your sleeves, and let your imagination run wild. Your upcycled globe lamp is sure to be a cherished addition to your home.
As always, safety first! If you’re unsure about any step in the process, consult a professional or seek guidance from experienced DIYers. Happy crafting!