Hello, fellow garden enthusiasts! Sara here from HomeReadyHub, and today we’re diving into a project that combines practicality with profound beauty: building your very own climbing plant trellis. Whether you dream of fragrant roses scaling your wall, vibrant clematis adorning your patio, or bountiful beans reaching for the sky, a well-constructed trellis is the unsung hero of many successful gardens. Not only do trellises provide essential structural support, guiding your plants upwards and preventing them from sprawling chaotically, but they also maximize vertical space, improve air circulation, and can even become stunning architectural features in their own right. Imagine the satisfaction of watching your plants thrive, knowing you’ve provided them with the perfect framework for growth. This tutorial will guide you through every step, from selecting the right materials to the final installation, ensuring your DIY trellis is both sturdy and stylish. Let’s get started and give your climbing plants the support they deserve!
Materials Needed
- Lumber: For a sturdy wooden trellis, consider 1x2 or 2x2 pressure-treated lumber (pine, cedar, or redwood are excellent choices for outdoor durability). You'll need enough for your frame and internal lattice. For a 6-foot tall by 3-foot wide trellis, budget for approximately 30-40 linear feet.
- Measuring Tape: Essential for accurate cuts and spacing.
- Pencil: For marking cuts and drill points.
- Saw: A miter saw or circular saw for precise cuts. A hand saw can work for smaller projects.
- Drill/Driver: For pre-drilling holes and driving screws.
- Drill Bits: Assorted sizes, including a countersink bit if you want screw heads flush.
- Exterior Wood Screws: 1.5-inch to 2.5-inch, galvanized or stainless steel to prevent rust.
- Wood Glue: Exterior-grade, waterproof wood glue for extra joint strength.
- Sandpaper or Electric Sander: For smoothing rough edges.
- Safety Glasses and Gloves: Always prioritize safety!
- Wood Stain or Exterior Paint (Optional): To protect the wood and add aesthetic appeal.
- Post-Hole Digger or Shovel (for in-ground installation): If you plan to anchor your trellis directly into the ground.
- Concrete Mix (for in-ground installation): For securing posts.
- Anchoring Hardware (for wall-mounted trellis): Wall anchors, stand-offs, and exterior screws appropriate for your wall material (e.g., masonry anchors for brick, lag screws for wood siding).
- Level: To ensure your trellis is plumb and square.
Preparation Steps
Step 1: Plan Your Trellis Design and Dimensions
Before you even pick up a saw, thoughtful planning is paramount. Begin by considering the type of climbing plant you intend to support. Is it a lightweight annual like sweet peas, a vigorous perennial like wisteria, or a heavy fruit-bearing vine like grapes? This will dictate the strength and spacing of your trellis. Next, assess the location: will it be freestanding in a garden bed, anchored against a wall, or integrated into a planter? Measure the available space carefully, accounting for both height and width. For freestanding trellises, remember to factor in the portion that will be buried in the ground for stability (typically 1-2 feet). For wall-mounted trellises, ensure you leave a few inches of space between the trellis and the wall for air circulation and plant growth. Sketch out your design on paper, noting the exact dimensions for the outer frame and the internal lattice pattern. Common patterns include a simple grid, a fan, or a diagonal lattice. Aim for lattice openings between 4 to 8 inches, depending on the plant’s tendril size. This detailed plan will serve as your blueprint, preventing costly errors and ensuring a perfect fit.
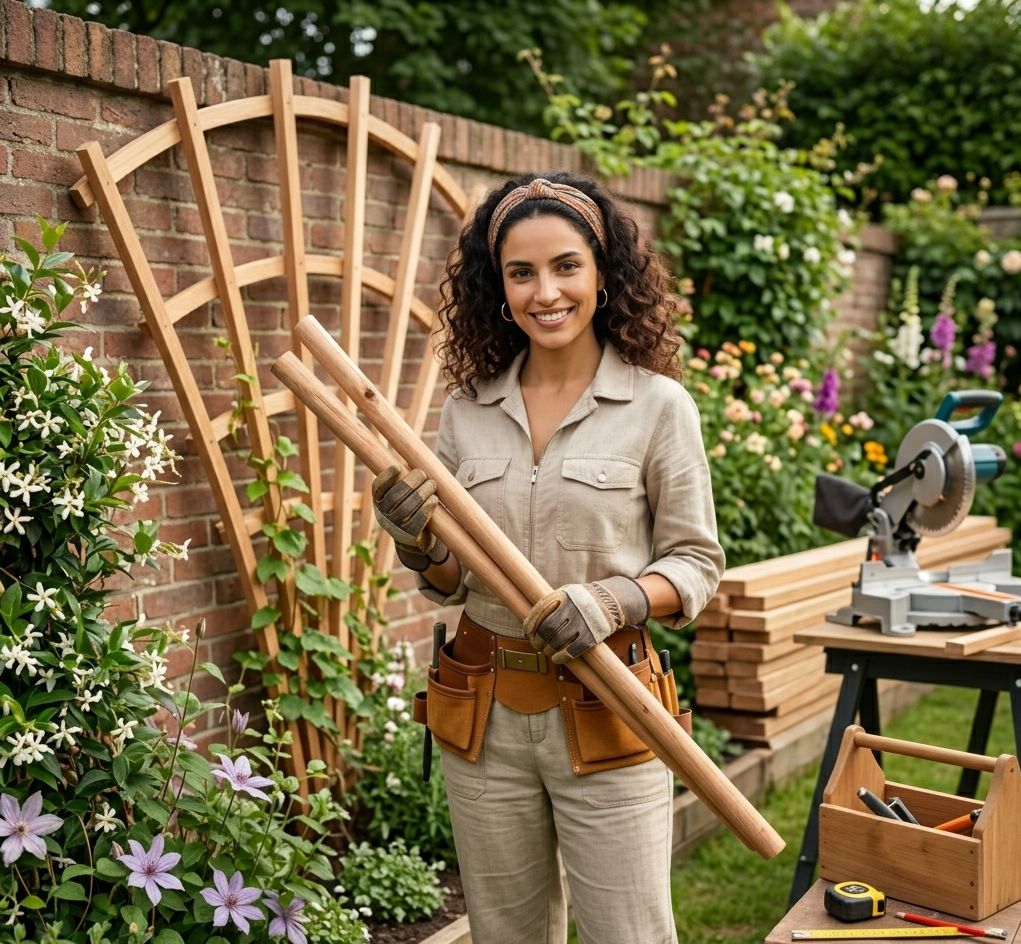
Step 2: Measure, Cut, and Prepare Your Lumber
With your design finalized, it’s time to bring your materials to life. Carefully measure each piece of lumber according to your blueprint. Use your pencil to mark the cut lines clearly. When cutting, always double-check your measurements and cut slowly and precisely with your saw. Accuracy here will ensure your trellis assembles correctly and looks professional. Once all your pieces are cut, take the time to sand any rough edges or splinters. This not only makes the trellis safer to handle but also provides a smoother surface for painting or staining, and prevents snags that could damage delicate plant tendrils. If you plan to stain or paint your trellis, it’s often easier to do so before assembly, especially for the internal lattice pieces. Apply a good quality exterior wood stain or paint that offers UV and moisture protection to significantly extend the life of your trellis.
Assembly
Step 3: Assemble the Outer Frame
Now that your lumber is prepped, we move to assembly. Begin by laying out the four pieces that will form your outer frame on a flat, level surface. These will be your two vertical posts and two horizontal cross-members. For a rectangular frame, ensure the corners are perfectly square using a carpenter's square. Apply a generous bead of exterior wood glue to the ends of the horizontal pieces where they will meet the vertical posts. Then, attach them using your exterior wood screws. Pre-drilling pilot holes will prevent the wood from splitting, especially when working close to the ends of the boards. Drive at least two screws per joint for maximum strength. For extra rigidity, consider using a lap joint or half-lap joint if you have the woodworking skills, though a simple butt joint with screws and glue is often sufficient for most trellises. Once the main frame is assembled, double-check its squareness and stability before proceeding.
Step 4: Create the Internal Lattice or Support Structure
With the outer frame securely in place, it’s time to add the internal supports that your plants will actually climb. This is where your chosen design pattern comes into play. For a simple grid pattern, measure and cut several horizontal and vertical slats. Begin by attaching the horizontal slats first, spacing them evenly according to your plan (e.g., every 6-12 inches). Use wood glue and a single screw at each end where they meet the vertical posts of the frame. Ensure they are level as you attach them. Once all horizontal slats are in place, add the vertical slats, weaving them over and under the horizontal ones if you desire a woven look, or simply attaching them on top. Secure each intersection with a small screw or a dab of wood glue. For a diagonal lattice, cut your slats at 45-degree angles and attach them in a crisscross pattern. The key is to create a robust network of climbing points that can support the plant’s weight and provide ample handholds for its tendrils. Ensure all screws are driven flush or slightly countersunk to avoid sharp edges.
Mistakes to Avoid
Building a trellis is rewarding, but a few common pitfalls can undermine its success. Firstly, **underestimating plant growth and weight** is a frequent mistake. That tiny clematis starts small, but a mature vine can become surprisingly heavy, especially when wet or laden with flowers. Always build your trellis sturdier than you think you’ll need, using appropriate lumber dimensions and strong fasteners. Secondly, **using unsuitable or untreated materials** for outdoor exposure will lead to premature failure. Regular pine will rot quickly; always opt for pressure-treated wood, cedar, redwood, or naturally rot-resistant materials like bamboo or metal. If using wood, ensure it's properly sealed or painted. Thirdly, **insufficient anchoring** is a recipe for disaster. A freestanding trellis that isn't deeply buried and concreted will topple in strong winds. A wall-mounted trellis needs robust anchors appropriate for the wall material, with stand-offs to allow air circulation. Never attach directly to siding without proper spacing. Fourthly, **improper spacing of lattice supports** can hinder plant growth. If the openings are too wide, delicate tendrils won't find purchase; if too narrow, the plant can become overcrowded and suffer from poor air circulation, leading to fungal diseases. Finally, **neglecting ongoing maintenance** is a mistake. Periodically check fasteners for rust or looseness, re-stain or paint as needed, and gently guide your plants as they grow to ensure they use the trellis effectively.
Pro Tips
To elevate your trellis from merely functional to truly spectacular, consider these pro tips. **Choose materials wisely for aesthetics and longevity.** While wood is classic, consider metal trellises for a modern look, or bamboo for an organic feel. Galvanized steel wire can be stretched between posts for a minimalist, almost invisible support for delicate vines. **Anchor with foresight.** For freestanding trellises, burying posts at least 18-24 inches deep and setting them in concrete will provide unparalleled stability against wind and heavy plant load. For wall-mounted options, use spacers (stand-offs) to create a gap of at least 2-4 inches between the trellis and the wall. This promotes air circulation, prevents moisture buildup on your house, and gives the plant room to wrap its tendrils. **Integrate your trellis into your garden design.** Don't just plop it down; make it an intentional feature. Use it to create privacy screens, define garden rooms, add vertical interest to a dull wall, or even form a living archway over a path. **Think about plant-specific needs.** Some plants, like roses, might need more horizontal support for tying, while others, like peas, benefit from a finer mesh. For heavy fruiting vines like gourds, consider adding extra horizontal bars or even small platforms. **Consider portability.** If you're growing annuals or live in a rental, a trellis built into a large planter box offers flexibility. **Regularly train and prune your climbers.** Gently tie new growth to the trellis as it emerges, guiding it along your desired path. Pruning not only maintains shape but also encourages bushier growth and more blooms. Lastly, **add decorative elements** like finials to the top posts or paint your trellis a complementary color to your home or garden palette for an extra touch of charm.
And there you have it – a comprehensive guide to building a beautiful and functional climbing plant trellis! This DIY project is incredibly rewarding, offering a tangible sense of accomplishment as you watch your garden flourish with your handcrafted support. Not only will your plants thank you for the robust framework, but you’ll also enjoy the enhanced beauty and structure a well-placed trellis brings to your outdoor space. From providing essential support and improving air circulation to transforming a plain wall into a living work of art, your new trellis will be a cornerstone of your garden for years to come. So gather your materials, embrace your inner craftsman, and get ready to enjoy the vertical splendor of your thriving climbing plants. Happy gardening from all of us at HomeReadyHub!