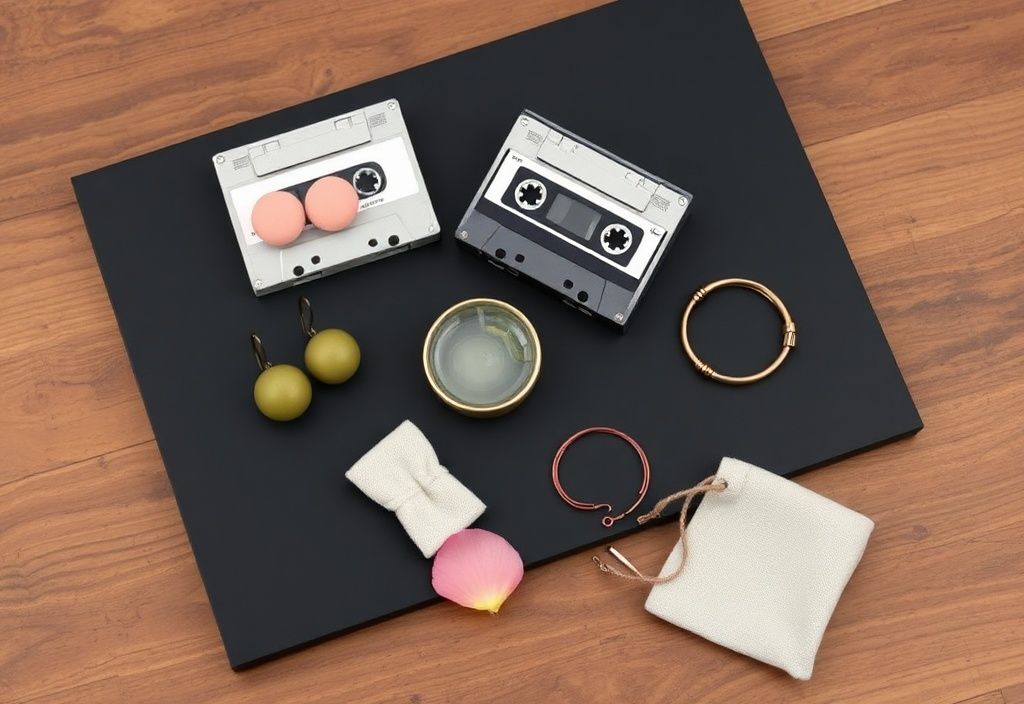
Are you a fan of vintage aesthetics and looking for a creative way to repurpose old cassette tapes? Upcycling cassette tapes into jewelry holders is a fun, eco-friendly, and stylish DIY project that adds a retro touch to your home decor. Whether you have a collection of old mixtapes or unused cassettes lying around, this tutorial will guide you through transforming them into functional and eye-catching storage for your favorite accessories. Let’s dive into this step-by-step guide and give your cassettes a new purpose!
Materials needed
- A used cassette tape (preferably with a clear or colorful plastic shell)
- Scissors or a craft knife
- Sandpaper (medium and fine-grit)
- Ruler and pencil
- Hot glue gun or strong craft glue (like E6000)
- Decorative elements (optional): paint, brushes, glitter, washi tape, or decoupage paper
- Hooks or small pegs (if you want to hang necklaces or bracelets)
- Magnet (optional, for securing earrings)
- Clear sealant spray (optional, to protect the paint)
Preparation steps
Step 1: Clean and disassemble the cassette
Start by gently removing the cassette tape from its plastic shell. You can do this by pressing the small tabs on the sides or using a flat tool to pry them open if they’re stuck. Once open, carefully remove the magnetic tape inside (you can discard this or save it for another craft project).
Wipe the plastic shell with a damp cloth to remove any dust or residue. If the shell is dirty, you can clean it with a mild soap solution and let it dry completely before proceeding.
Step 2: Sand the surface for better adhesion
If you plan to paint or decorate the shell, lightly sand the outer surface with medium-grit sandpaper. This step helps the paint or glue adhere better to the plastic. Wipe away any dust with a damp cloth.
For a glossy finish, you can also sand the inside of the shell to smooth out any rough edges. Use fine-grit sandpaper for this step to avoid scratching the plastic.
Assembly
Step 3: Customize the design
This is where your creativity comes into play! Here are a few ideas to customize your cassette jewelry holder:
Painted Design: Use acrylic paint to give your cassette a fresh look. You can paint the entire shell a solid color, create patterns, or even paint a design like flowers, stripes, or polka dots. Let the paint dry completely before moving on to the next step. For extra durability, spray a clear sealant over the painted surface.
Decoupage: Use decoupage paper, magazine cutouts, or even fabric to create a unique design on the shell. Apply a thin layer of decoupage glue (like Mod Podge) to the back of the paper, place it on the shell, and smooth out any bubbles. Seal it with another layer of decoupage glue.
Washi Tape or Stickers: If you prefer a quick and easy option, use washi tape or decorative stickers to add color and patterns to your cassette. This is a great option for beginners or kids!
Adding Hooks or Pegs: If you want to hang necklaces or bracelets, use small hooks or pegs. Measure where you want to place them and mark the spots with a pencil. Use a hot glue gun to attach the hooks or pegs to the inside of the shell. For earrings, you can glue a small magnet inside the cassette lid to hold them in place.
Step 4: Assemble the jewelry holder
Once your design is complete and all the glue or paint is dry, it’s time to assemble the jewelry holder. Place the inside tray (the part that held the magnetic tape) back into the shell. This tray will act as the base for your jewelry.
If you want to add a lid to your jewelry holder, you can use the cassette lid itself. Attach a small hinge or just prop it up against the shell when not in use. Alternatively, you can leave the lid off for an open-style holder.
For a hanging jewelry holder, attach a small loop of wire or a ribbon to the top of the shell. You can also use a command hook to hang it on a wall or inside a closet door.
Mistakes to avoid
- Using a cassette with a damaged shell: Avoid using cassettes that are cracked or broken, as they may not hold your jewelry securely.
- Skipping the sanding step: If you paint or glue without sanding the plastic, the design may not adhere properly and could peel off over time.
- Overloading the holder: Don’t cram too many pieces of jewelry into the cassette, as this can cause the hooks or pegs to break or the jewelry to get tangled.
- Using weak glue: Avoid using regular school glue for attaching hooks or decorating, as it may not hold up over time. Use a strong craft glue or hot glue gun for best results.
Pro tips
- Mix and match: Combine different colors or patterns to create a vibrant jewelry holder. You can use multiple cassettes to create a set.
- Add lighting: For a fancy touch, glue small battery-operated LED lights inside the cassette to illuminate your jewelry. Battery-operated tea lights work well for this!
- Personalize it: Write the names of family members on the cassette or add photos using decoupage for a personalized touch.
- Use for other storage: Your upcycled cassette isn’t just for jewelry! Use it to store small craft supplies, coins, or even as a mini desk organizer for paper clips and thumbtacks.
- Try a no-glue option: If you don’t want to use glue, you can create a simple jewelry holder by bending the metal tabs inside the cassette to hold necklaces or bracelets in place.
Upcycling cassette tapes into jewelry holders is a rewarding DIY project that combines sustainability with creativity. Not only will you give old items a new life, but you’ll also add a unique and personal touch to your home decor. Whether you’re a beginner or an experienced crafter, this project is easy to customize and fun to make. So dig out those old cassettes, gather your materials, and start crafting your very own retro jewelry holder today!
We’d love to see your creations! Share your upcycled cassette jewelry holders with us on social media by tagging #HomeReadyHub and inspiring others to join the upcycling movement.