Imagine sipping a velvety raspberry liqueur that you crafted yourself—rich, fruity, and just sweet enough to enjoy neat or in your favorite cocktails. Homemade raspberry liqueur, or liqueur framboise maison, is a delightful project for any home bartender or cocktail enthusiast. Not only does it taste far superior to store-bought versions, but it also makes a thoughtful, personalized gift. Plus, it’s surprisingly easy to make with just a few ingredients and some patience.
In this tutorial, we’ll walk you through the entire process—from selecting the best raspberries to infusing the flavors and achieving the perfect balance of sweetness. Whether you're a beginner or a seasoned infuser, this guide will help you create a liqueur that’s smooth, vibrant, and bursting with raspberry flavor.
Materials needed
- Fresh raspberries – 2 cups (about 250g). Choose ripe, unblemished berries for the best flavor. Organic is best if possible.
- High-proof neutral alcohol – 1 cup (250ml) of vodka (at least 80 proof) or clear grain alcohol (like Everclear). Avoid flavored or colored alcohol.
- Granulated sugar – 1 cup (200g). Adjust to taste if you prefer a less sweet liqueur.
- Water – 1/2 cup (120ml), filtered or spring water works best.
- Glass jar with lid – A clean, sterilized 1-quart (1-liter) mason jar or swing-top bottle.
- Cheesecloth or fine mesh strainer – For filtering the liqueur after infusing.
- Funnel – Optional, for easier pouring.
- Labels and pen – To date and personalize your creation.
Preparation steps
Step 1: Prepare the raspberries
Start by washing the raspberries gently under cool water to remove any dirt or debris. Do not soak them—raspberries are delicate and can absorb too much water, diluting their flavor. Pat them dry with a clean towel or paper towels. Removing excess moisture will help the alcohol infuse more effectively.
Once dry, slightly crush the raspberries—either by hand or with a mortar and pestle. You don’t need to puree them; just release some of the juices and break the skins to expose more surface area to the alcohol. This step ensures a deeper, more vibrant flavor in your final liqueur.
Pro tip: If you prefer a smoother liqueur without seeds, you can strain the raspberries after infusion using cheesecloth. But for a rustic, textured drink, skip this step and leave the pulp in.
Step 2: Sterilize your jar and tools
Cleanliness is key to preventing spoilage or off flavors. Sterilize your glass jar, lid, and any utensils by boiling them in water for 10 minutes or running them through the dishwasher on a hot cycle. Allow everything to cool completely before use. A clean environment ensures your liqueur stays fresh and flavorful for months.
Once cooled, place the crushed raspberries into the jar. Pour in the alcohol—vodka or clear grain alcohol—until the berries are fully submerged. This prevents oxidation and mold growth. Seal the jar tightly with the lid.
Assembly
Step 3: Infuse the flavors
Store the jar in a cool, dark place—like a pantry or cupboard—away from direct sunlight. Let the raspberries steep in the alcohol for at least 3 days, but for the best flavor, aim for 1 to 2 weeks. The longer they infuse, the more intense and complex the raspberry flavor becomes.
Gently shake or swirl the jar every day to help the alcohol absorb the fruit’s oils and colors. You’ll notice the liquid turning a beautiful pinkish-red hue over time. Taste after 3 days—if it’s already flavorful, you can move to the next step. If it’s still weak, let it infuse longer.
Step 4: Strain and sweeten
Once satisfied with the infusion, it’s time to strain and sweeten the liqueur. Place a fine-mesh strainer or cheesecloth over a clean bowl or measuring cup. Slowly pour the raspberry-infused alcohol through the strainer, pressing gently on the berries to extract all the liquid.
Discard the raspberry pulp (or save it for baking, smoothies, or compost). Measure the strained liquid—you should have about 1 cup of infused alcohol. In a clean saucepan, gently heat the water and sugar over low-medium heat, stirring until the sugar fully dissolves. Do not boil—this prevents the sugar from caramelizing and keeps the flavor clean.
Let the sugar syrup cool slightly, then slowly pour it into the raspberry-infused alcohol. Stir well to combine. Taste and adjust sweetness if needed—add a bit more syrup for sweetness or a splash of water if it’s too strong.
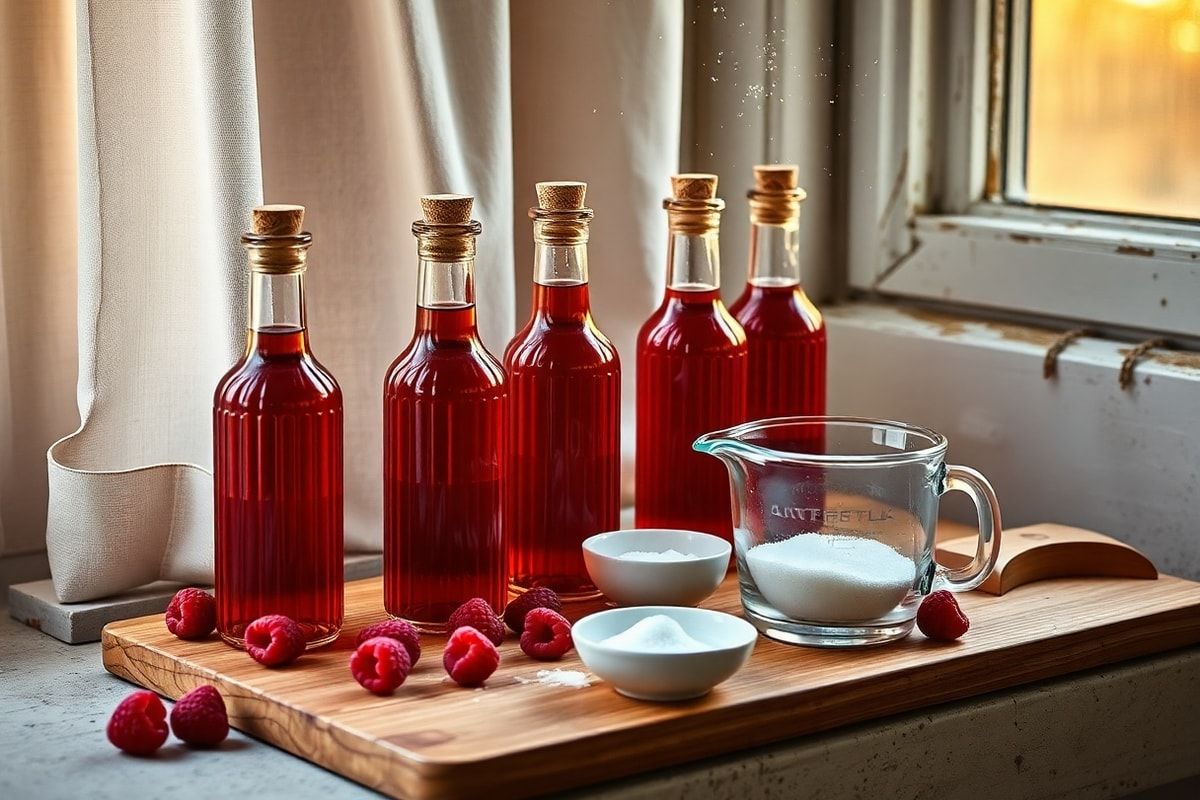
Transfer the liqueur to a clean bottle using a funnel. Seal tightly and store in a cool, dark place. Let it rest for at least 1 week before serving. This resting period allows the flavors to meld and mellow, resulting in a smoother, more balanced liqueur.
Mistakes to avoid
- Using underripe or overripe raspberries – Underripe berries lack sweetness, while overripe ones can ferment or spoil faster. Choose berries that are deep red, firm, and fragrant.
- Skipping the sterilization – Unsterilized jars can introduce bacteria, leading to spoilage. Always clean and sterilize your equipment.
- Using flavored or colored alcohol – These can overpower the raspberry taste and alter the color.
- Infusing for too short a time – While you can drink it after 3 days, a week or two yields far better flavor.
- Boiling the sugar syrup – High heat can create a burnt, bitter taste. Keep it low and slow.
- Overexposing to light – Sunlight can degrade the color and flavor. Store your liqueur in a dark place.
Pro tips
- Use frozen raspberries – If fresh raspberries aren’t in season, frozen ones work great! There’s no need to thaw—just crush them slightly and proceed as usual. Frozen berries often have more concentrated flavor.
- Add a vanilla bean or citrus peel – For a gourmet twist, split a vanilla bean and add it during infusion, or include a strip of lemon or orange peel. These add depth and complexity.
- Experiment with infusions – Try adding a cinnamon stick, clove, or star anise during the infusion for a spiced raspberry liqueur.
- Age it longer – For a more sophisticated taste, age your liqueur for 1–2 months. The flavors become smoother and more integrated.
- Dilute with water if too strong – If the alcohol taste is too pronounced, add a splash of filtered water. This softens the burn and highlights the raspberry flavor.
- Label and date – Always label your liqueur with the date and ingredients. Most homemade liqueurs last 6–12 months when stored properly.
Did you know? Homemade raspberry liqueur is a classic ingredient in French kir (a mix of white wine and crème de cassis or framboise), and is also delicious in cocktails like the Raspberry Mojito or a Framboise Spritz.
Once you’ve mastered the basics, feel free to get creative! Try infusing with other berries, herbs, or spices to make unique variations.
Safety note: While alcohol acts as a preservative, always use clean tools and ingredients to prevent contamination. If your liqueur develops an off smell, mold, or bubbles, discard it.
Enjoy your homemade liqueur framboise maison! Whether you sip it chilled, drizzle it over desserts, or use it to elevate your cocktails, this DIY liqueur is a rewarding project with delicious results. Cheers to crafting your own liquid gold!