Ah, chapped lips! That familiar, uncomfortable tightness, the stinging when you smile, the endless search for a balm that truly works. We’ve all been there. Whether it’s the biting winter wind, the harsh summer sun, or simply dehydration, dry and cracked lips can be a real nuisance, making eating, talking, and even smiling a painful ordeal. But what if I told you that the secret to soft, supple, and perfectly pouted lips isn't hidden in an expensive store-bought tube, but rather in your own kitchen? That's right! Here at HomeReadyHub, we believe in empowering you to create natural, effective solutions for everyday woes, and today, we're tackling chapped lips head-on.
Making your own chapped lip repair balm is not only incredibly satisfying but also allows you to control every single ingredient that goes onto your delicate lip skin. No more worrying about questionable chemicals, artificial fragrances, or unnecessary fillers. Instead, you'll be harnessing the power of nature's best emollients, humectants, and healers to create a balm tailored specifically to your needs. Imagine a rich, soothing concoction that not only provides instant relief but actively works to repair and protect your lips, leaving them feeling velvety smooth and utterly kissable. Ready to transform your pout? Let's dive into this simple, rewarding DIY project and craft your very own ultimate chapped lip repair balm!
Materials Needed
- Waxes (for structure and protection):
- Beeswax Pellets (2 tablespoons): The gold standard for lip balms. It provides firmness, creates a protective barrier, and helps lock in moisture. Opt for cosmetic-grade beeswax.
- Vegan Alternative: Candelilla Wax (1.5 tablespoons) or Carnauba Wax (1 tablespoon): If you prefer a plant-based option, these waxes work similarly but require slightly different ratios for firmness.
- Butters (for deep nourishment and creaminess):
- Shea Butter (1.5 tablespoons): Incredibly moisturizing, rich in vitamins A and E, and known for its healing properties. It gives the balm a luxurious, creamy texture.
- Cocoa Butter (1.5 tablespoons): Adds a beautiful chocolatey aroma (if unrefined) and is excellent for skin elasticity and protection.
- Optional: Mango Butter (replace some shea/cocoa butter): Lighter texture than shea, also very nourishing.
- Liquid Oils (for hydration and glide):
- Coconut Oil (2 tablespoons): A fantastic emollient, easily absorbed, and has a pleasant scent. Choose virgin coconut oil for extra benefits.
- Sweet Almond Oil (1 tablespoon): Rich in vitamins E, A, and D, it's soothing and helps to heal chapped skin.
- Jojoba Oil (1 tablespoon): Mimics the skin's natural sebum, making it highly compatible and non-greasy. Excellent for all skin types.
- Optional: Castor Oil (1/2 teaspoon): Adds a lovely shine and a slightly thicker texture.
- Healing & Enhancing Additives:
- Vitamin E Oil (1 teaspoon): A powerful antioxidant that helps repair damaged skin and extends the shelf life of your balm.
- Pure Honey (1/2 teaspoon, optional): A natural humectant and antiseptic, great for extra healing power.
- Lanolin (1/2 teaspoon, optional, not for vegan): An intensely moisturizing emollient that provides excellent barrier protection.
- Essential Oils (for scent and therapeutic benefits, optional):
- Peppermint Essential Oil (5-8 drops): Provides a refreshing tingle and can help soothe irritation.
- Lavender Essential Oil (3-5 drops): Calming and renowned for its healing properties.
- Tea Tree Essential Oil (2-3 drops, use sparingly): Known for its antiseptic qualities, good for very damaged lips.
- Always use cosmetic-grade essential oils and dilute properly.
- Equipment:
- Double Boiler Setup: A heat-safe glass measuring cup or bowl placed over a pot of simmering water. Essential for gentle melting.
- Measuring Spoons and Cups: For precise ingredient amounts.
- Small Spatula or Stirring Rod: For mixing.
- Small Lip Balm Containers: Tubes (yields approx. 10-12 standard tubes) or small tins (yields approx. 4-6 standard tins). Ensure they are clean and sterilized.
- Pipette or Dropper (optional): For precise essential oil addition and pouring into tubes.
Preparation Steps
Step 1: Sanitize Your Workspace and Tools
Before you begin any DIY beauty project, hygiene is paramount, especially when creating something for your lips. Start by thoroughly cleaning and sanitizing your work surface. Wipe down your countertops with an antibacterial spray or a mixture of rubbing alcohol and water. Next, sterilize all your equipment. Wash your double boiler components, measuring spoons, stirring tools, and especially your lip balm containers (tubes or tins) with hot, soapy water. Rinse them thoroughly and then either air dry completely or place them in a preheated oven at its lowest setting (around 200°F or 90°C) for 10-15 minutes to ensure they are completely dry and free of any bacteria. Allow them to cool before handling. This crucial step prevents contamination and ensures your homemade lip balm is safe and has a longer shelf life.
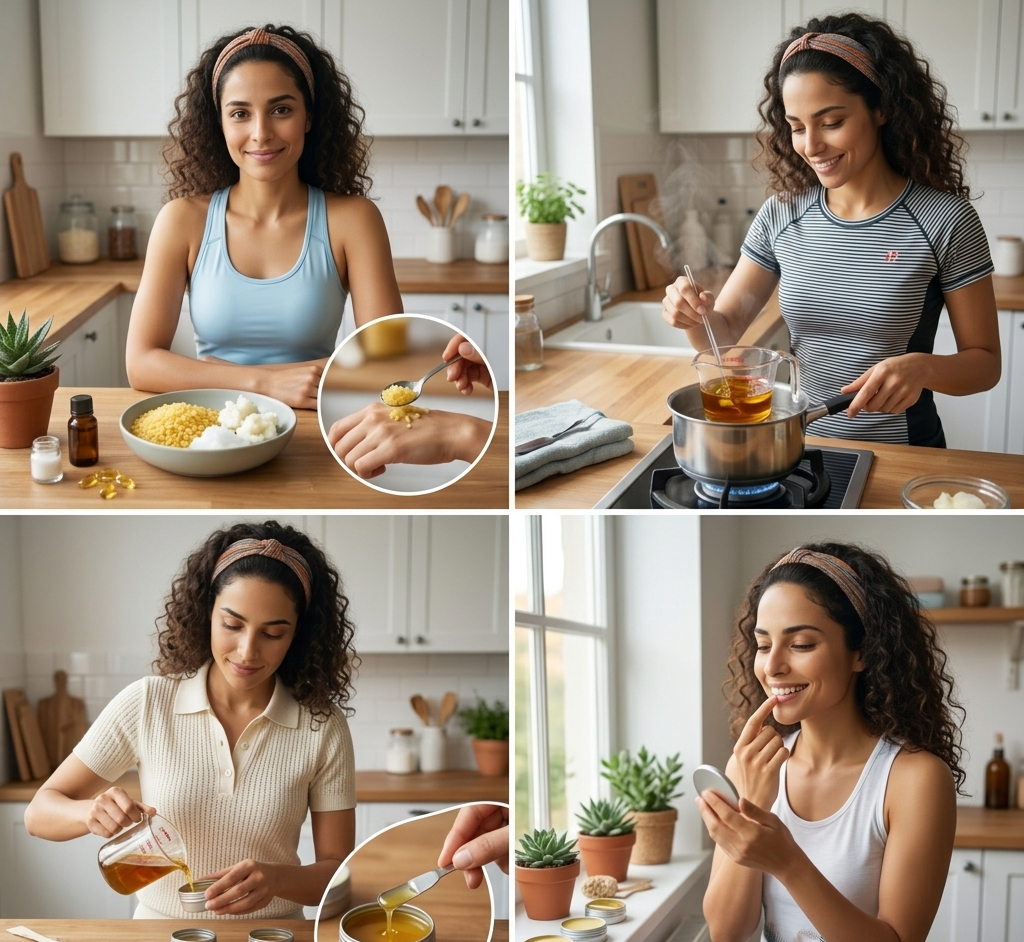
Step 2: Measure and Combine Waxes and Butters
Now that your workspace is pristine, it's time to gather your core ingredients. Accurately measure out your beeswax pellets (2 tablespoons), shea butter (1.5 tablespoons), and cocoa butter (1.5 tablespoons). Place these solid ingredients into your heat-safe glass measuring cup or bowl. Set up your double boiler by filling a saucepan with about 1-2 inches of water and bringing it to a gentle simmer over medium-low heat. Carefully place the glass measuring cup containing the waxes and butters into the saucepan, ensuring the bottom of the cup doesn't touch the simmering water directly. The steam from the simmering water will gently and slowly melt the ingredients. Stir occasionally with your spatula or stirring rod to help them melt evenly. This gentle melting process is crucial to preserve the beneficial properties of the butters and waxes, preventing them from overheating or burning.
Assembly
Step 3: Introduce Liquid Oils and Healing Additives
Once your waxes and butters have completely melted into a clear, uniform liquid, it's time to incorporate the liquid oils. Carefully remove the glass measuring cup from the double boiler (use oven mitts, as it will be hot!). Add your measured coconut oil (2 tablespoons), sweet almond oil (1 tablespoon), and jojoba oil (1 tablespoon) to the melted mixture. Stir gently but thoroughly until all the oils are fully combined. The addition of the cooler liquid oils might cause the mixture to cool slightly and start to thicken around the edges, which is normal. At this stage, you can also add your optional healing additives: Vitamin E oil (1 teaspoon), pure honey (1/2 teaspoon), and/or lanolin (1/2 teaspoon). Stir well after each addition to ensure everything is evenly distributed throughout the balm base. Continue stirring for a minute or two to ensure all ingredients are fully integrated and the mixture remains liquid.
Step 4: Add Essential Oils and Pour
This is the final step before pouring your beautiful balm! It's important to add essential oils once the mixture has been removed from the heat and has cooled slightly, but is still liquid. Adding them to a very hot mixture can cause the volatile essential oils to evaporate, diminishing their scent and therapeutic benefits. Allow the mixture to cool for about 3-5 minutes, then add your chosen essential oils. For a refreshing balm, add 5-8 drops of peppermint essential oil. For a soothing and healing balm, 3-5 drops of lavender essential oil works wonders. If you're dealing with very compromised lips, 2-3 drops of tea tree oil (use sparingly!) can be beneficial. Stir one last time to ensure the essential oils are evenly dispersed. Now, working quickly but carefully, pour the liquid balm into your sterilized lip balm tubes or tins. If using tubes, a pipette or dropper can be very helpful for a clean pour. Fill them almost to the top, as the balm will contract slightly as it cools. Leave the containers undisturbed on a flat, stable surface for several hours, or preferably overnight, to allow the balm to cool and solidify completely. Resist the urge to move or touch them until they are firm. Once solid, cap your containers, and your homemade chapped lip repair balm is ready to use!
Mistakes to Avoid
- Skipping Sanitation: Failing to properly clean and sterilize your tools and containers can introduce bacteria, leading to a contaminated product with a shorter shelf life and potential skin irritation. Always prioritize hygiene.
- Overheating Ingredients: Melting waxes and butters directly over high heat or boiling water can degrade their beneficial properties. Always use a double boiler on low heat to ensure a gentle, even melt.
- Inaccurate Measurements: Lip balm consistency is a delicate balance. Too much wax can make it too hard and drag on the lips, while too little can result in a soft, messy balm that doesn't hold its shape. Use precise measurements for best results.
- Adding Essential Oils Too Soon: Essential oils are volatile. Adding them to a very hot mixture will cause them to evaporate, reducing their potency, scent, and therapeutic benefits. Always add them after removing the mixture from heat and allowing it to cool slightly.
- Rushing the Cooling Process: Moving or capping your balm before it has fully solidified can lead to an uneven texture, air bubbles, or a balm that doesn't set properly. Patience is key for a smooth, professional finish.
- Using Irritating Essential Oils: Some essential oils are too strong or phototoxic for lip application. Always research essential oil safety for topical use, especially on delicate areas like the lips, and ensure proper dilution. Stick to well-known lip-safe options like peppermint or lavender.
- Not Stirring Thoroughly: If ingredients aren't fully incorporated, you might end up with an inconsistent balm, where some parts are more oily and others more waxy. Stir well after each addition.
Pro Tips
- Customization is Key: Don't be afraid to experiment with different butters and oils once you're comfortable with the basic recipe. Try mango butter for a lighter feel, or add a tiny pinch of cosmetic-grade mica powder for a subtle tint.
- Natural Flavoring: For a delightful taste, add a few drops of natural, food-grade flavor oils (like vanilla, cherry, or strawberry) along with your essential oils. Start with just a drop or two and taste-test on a spoon (after it cools and solidifies!) before committing.
- Shelf Life and Storage: Homemade lip balms typically last 6-12 months, depending on the ingredients and storage conditions. Store them in a cool, dark place away from direct sunlight and extreme temperatures to prolong their freshness and prevent melting. Adding Vitamin E oil helps extend shelf life.
- Gift-Giving Gold: These DIY lip balms make fantastic, thoughtful gifts! Package them in cute bags, add custom labels, and share the gift of hydrated lips with friends and family.
- Scaling the Recipe: This recipe can easily be scaled up or down. Just maintain the same ratios of waxes, butters, and oils. If you're making a large batch, you might want to invest in a dedicated pouring pot with a spout.
- Patch Test Essential Oils: If you're new to using essential oils, always perform a patch test on a small area of skin (like your inner arm) before applying it to your lips, especially if you have sensitive skin.
- Vegan Alternatives: As mentioned in the materials, candelilla or carnauba wax are excellent plant-based alternatives to beeswax. Ensure your butters and oils are also ethically sourced and vegan-friendly if this is a priority for you.
- Layering for Intense Repair: For severely chapped lips, apply a generous layer of your homemade balm before bed. The longer contact time allows the nourishing ingredients to work their magic overnight, leading to significantly softer lips by morning.
There you have it, HomeReadyHub family! Your very own, handcrafted, deeply nourishing chapped lip repair balm. No more wincing, no more peeling, just pure, blissful hydration. Creating your own beauty products is not just about saving money; it's about connecting with what you put on your body, understanding the power of natural ingredients, and enjoying the satisfaction of a job well done. This isn't just a lip balm; it's a little pot of self-care, mixed with love and intention. So, go ahead, give your lips the tender loving care they deserve, and embrace that soft, healthy smile. We'd love to hear about your balm-making adventures and your favorite ingredient combinations in the comments below!