Your bedroom is your sanctuary—a place of rest, relaxation, and personal expression. A headboard isn’t just functional; it’s a statement piece that sets the tone for the entire room. If you’re looking for a budget-friendly, eco-conscious, and stylish way to elevate your space, a pallet wood headboard with integrated LED lighting is the perfect DIY project. This tutorial will guide you through creating a rustic-chic headboard that glows softly, adding warmth and ambiance to your bedroom.
Materials Needed
- Pallets: Choose 2-3 wooden pallets (ensure they are heat-treated, marked "HT"). Avoid chemically treated pallets (marked "MB").
- LED Light Strips: Waterproof, warm white (3000K-4000K) with adhesive backing for easy installation.
- Power Supply: USB adapter or 12V DC power source compatible with your LED strips.
- Wood Glue: High-quality wood glue for securing pallet slats.
- Sandpaper: Medium (120-150 grit) and fine (220 grit) for smoothing rough edges.
- Screws & Drill: 2-inch wood screws and a drill for assembly.
- Staple Gun: For attaching LED strips to the headboard.
- Wood Stain or Paint: Optional, for customizing the look (e.g., whitewash, gray, or natural stain).
- Paintbrush/Roller: For applying stain or paint.
- Measuring Tape & Level: To ensure precise cuts and alignment.
- Safety Gear: Gloves, goggles, and a dust mask for sanding.
Preparation Steps
Step 1: Disassemble and Clean the Pallets
Start by carefully disassembling the pallets using a crowbar or pallet buster. Remove all nails and separate the wooden slats. Clean them thoroughly with a stiff brush to remove dirt, splinters, or debris. If the pallets are painted or stained, sand them lightly to prepare for your chosen finish.
Step 2: Sand and Treat the Wood
Sand each slat with medium-grit sandpaper to smooth rough edges and splinters. Follow up with fine-grit sandpaper for a silky finish. Wipe away dust with a damp cloth. For additional protection, apply a wood conditioner or sealant, especially if you’re staining or painting the headboard.
Step 3: Design Your Headboard Layout
Lay out the pallet slats on a flat surface to plan your headboard design. Decide on the dimensions (standard headboard heights range from 54" to 60"). Arrange the slats vertically or horizontally, leaving small gaps (½" to 1") between them for a modern, open look. Mark the placement of each slat with a pencil.
Step 4: Cut and Assemble the Frame (Optional)
If you want a more polished look, build a simple frame using additional pallet wood. Measure and cut two vertical pieces (for the sides) and one horizontal piece (for the top or bottom). Assemble the frame with wood glue and screws, ensuring it’s square using a level.
Assembly
Step 5: Attach the Pallet Slats to the Frame
Apply wood glue to the edges of the pallet slats and press them into place on the frame, following your marked layout. Secure each slat with screws from the back of the frame, spacing them evenly. For a floating look, attach the slats directly to the wall using heavy-duty anchors or a French cleat system.
Step 6: Sand and Finish the Headboard
After assembly, sand any rough spots or edges. Wipe away dust and apply your chosen finish—whether it’s a natural stain, whitewash, or paint. Let the headboard dry completely before proceeding. For a weathered look, lightly distress edges with sandpaper after staining.
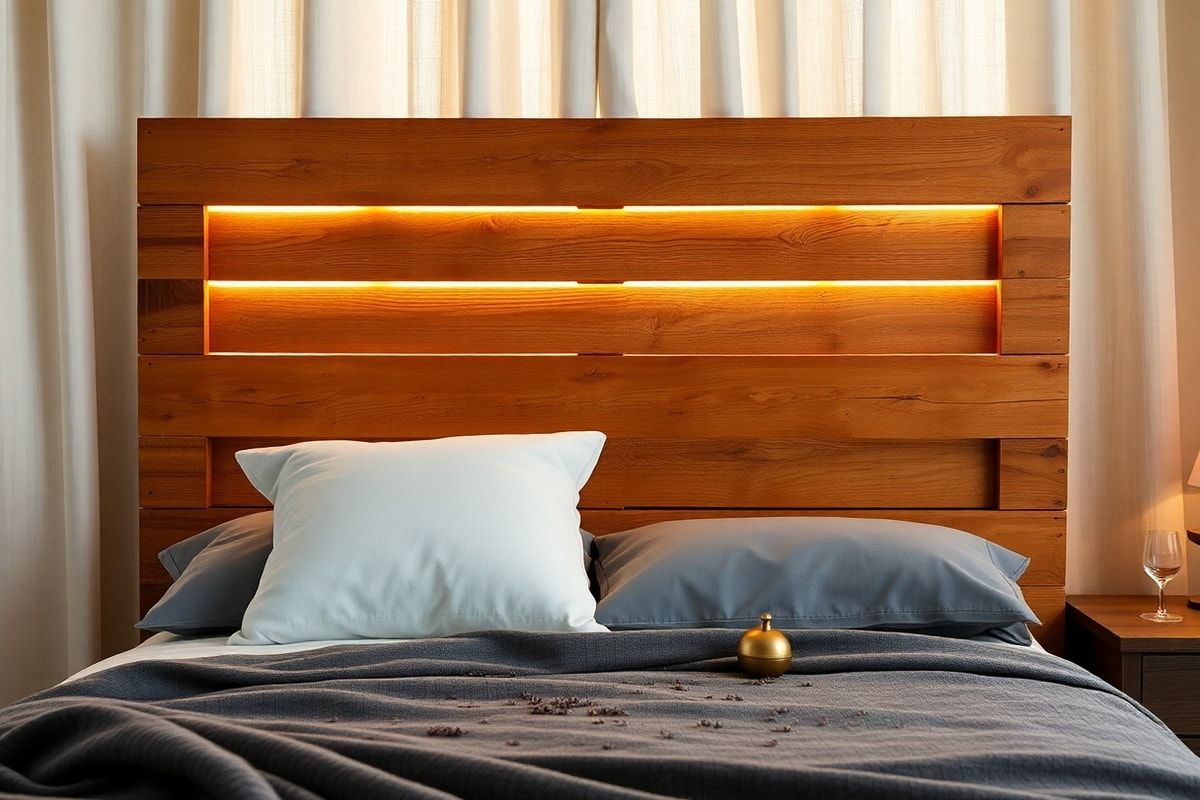
Step 7: Install the LED Light Strips
Plan the LED placement to highlight the headboard’s features. Common options include:
- Outlining the edges with linear lights.
- Running strips vertically behind the slats for a backlit glow.
- Creating a pattern (e.g., geometric shapes) for a custom effect.
Peel the adhesive backing and press the LED strips firmly into place. Use a staple gun to secure them along the edges or behind the slats. Connect the strips to the power supply, ensuring the voltage matches. Test the lights before final installation.
Step 8: Mount the Headboard to the Wall
Position the headboard against the wall, using a level to ensure it’s straight. For a permanent mount, use heavy-duty anchors or a French cleat. For a removable option, attach L-brackets to the back of the headboard and secure them to wall studs. Hide cables behind the headboard or along the wall for a clean look.
Mistakes to Avoid
- Skipping the Sanding Step: Rough edges can tear fabrics or catch on clothing. Always sand thoroughly.
- Using Untreated Pallets: Chemically treated pallets (MB) can release toxins. Stick to "HT"-marked pallets.
- Overloading the Headboard: Pallet wood is sturdy but not indestructible. Avoid hanging heavy items like shelves directly on the slats.
- Ignoring LED Compatibility: Ensure your power supply matches the LED strip’s voltage to prevent overheating or burnout.
- Skipping the Test Run: Always test the LED lights before mounting to troubleshoot wiring issues.
Pro Tips
- Customize the Design: Mix pallet slats with reclaimed barn wood or metal accents for a unique look.
- Add a Back Panel: For a cleaner appearance, attach a thin plywood or fabric panel to the back of the headboard before installing the slats.
- Use Smart LEDs: Upgrade to RGB or tunable white LED strips for adjustable lighting via smartphone.
- Enhance with Upholstery: Add fabric or leather to the back of the headboard for a luxe, cushioned effect.
- Safety First: If mounting near a bed, use low-voltage LEDs (12V) for safety.
- Personalize the Finish: Try a two-tone look by staining some slats dark and others light for a modern contrast.
Creating a pallet wood headboard with LED lighting is a rewarding project that combines creativity, sustainability, and functionality. Whether you’re a seasoned DIYer or a beginner, this guide ensures you’ll end up with a headboard that’s as unique as your style. Plus, the soft glow of the LEDs will transform your bedroom into a cozy retreat.
Ready to get started? Gather your materials, clear some space, and let’s bring this dreamy headboard to life. Share your finished project with us on social media using #HomeReadyHub—we can’t wait to see your masterpiece!
Sweet dreams and happy crafting!
